FishwithJD

The web's best fishing magazine

  • Start Here
  • Guided Trips With JD
  • Catch Steelhead
  • Store
  • JD’s Gear
    • Steelhead
    • Kokanee
    • River Salmon Trolling
    • Plug Fishing for Salmon
    • Light Tackle Surf Perch
  • Techniques
    • Bass
    • Boats & Boating
    • Cooking
    • Fly Fishing
    • Salmon
    • Saltwater
    • Shad
    • Steelhead
    • Stripers
    • Sturgeon
    • Trout & Kokanee

It’s here! The Ultimate Guide to Steelhead Bank Fishing

March 3, 2016 By JD 3 Comments

Filed Under: Steelhead Tagged With: Steelhead

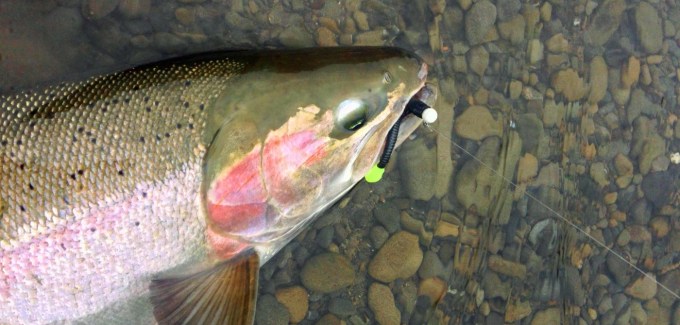
The Steelhead’s Worst “Nightmare”

February 15, 2016 By JD 6 Comments


It’s funky looking…and quite frankly, a color scheme I would never in a million years have thought about using.
It’s just too odd: red, white and black.We are so conditioned as steelheaders that pinks and oranges are our friends — and this color scheme is so outside that “norm” that it’s hard to take it seriously.

But trust me when I say that the Nightmare color pattern is aptly named – it is one heck of a steelhead producer and should be in everyone’s arsenal.

But why?

When it comes to breaking down why critters with pea-sized brains do the things they do, it’s sometimes better to just accept the facts and move on without over-analyzing the situation. But in this case, I just can’t let it go. For some reason, the steelhead’s affinity for red, black and white has my left-brain working on overdrive (which, after the college party years is running low on disk space).

Okay, here’s my best guess: The black and red portion of the Nightmare kinda makes sense to me. I guess you can say it’s a little more natural – even sorta “buggy” looking.


Less intrusive than a lot of the fluorescent colors we fish, it may be able to “sneak up” on wary fish better than the bright stuff – especially in low, clear or pressured waters – yet still provide enough attraction to get fish to bite it. Kinda makes sense, right?

The white part, however, has me stumped. The only thing I can come up with is that it provides contrast when used in concert with the other two colors.

Okay, that’s all I’ve got. Time to get on the phone and ask around…

First, I called the very guy who I feel has caught more steelhead on jigs than anyone I know: Nick Amato, editor of Salmon Trout Steelheader Magazine. He’s also the person who helped me catch my first steelhead on a jig a million years ago.

“Geez, I donno why they like the Nightmare color,” said Nick. “I guess it kinda looks like a bug and has some natural color shades. Plus, you have the contrast in there…but who knows really why they bite it?”

My next call was to Jimmy Davis, owner of Mad River Manufacturing. He’s pumped out a bazillion Nightmare worms from his facility and I figured maybe some of his many customers might have shed some light on the subject.

“I’m no totally sure, but the Nightmare sure seems to get their attention,” he said. “I guess it’s the contrast for one. And maybe the more natural colors.”

At that point, I was sensing a pattern, but had one more call to make. I rang up Bob Kratzer, Owner of Angler’s Guide Service on Washington’s Olympic Peninsula. He fishes a ton of worms and jigs each year and is a big fan of the Nightmare. He’d surly have a good theory, right?

“Ha, ha, ha! I’ve got no idea why they eat that thing,” he said. “But it’s crazy how much they love the Nightmare. It’s gotta be the contrast and the color is more natural looking than bright pink.”

Bob also noted that a couple of his customers over the years have reported seeing natural worms in the gravel that wiggled away before being apprehended – worms that had a similar red hue to that of the Nightmare. So, there may be something to that but Bob’s never seen one himself.

After my phone work, I was feeling better that maybe my personal theories weren’t so hair-brained after all. The contrast and toned-down coloration was certainly a common theme. And that makes sense too when you consider that the consensus from my impromptu panel of experts was that the Nightmare is at its fishy best in low and clear water conditions.

But the bottomline is nobody really knows for sure why steelhead are drawn to this color pattern.

One thing’s for certain, however: steelhead love a good Nightmare!

Filed Under: Steelhead, Techniques Tagged With: jigs, nick amato, nightmare, Steelhead, worms

How To Rig a Side Planer for Steelhead Plug Fishing

March 9, 2015 By JD 17 Comments

Hot Shot side planer wide angle
Back trolling plugs is one of my favorite ways to fish for steelhead. The way a big steelie tries to atomize a plug that comes wobbling into its lair is so awesome!

It’s a technique that can really yield results – and plugs often attract the biggest fish in the creek: The giant males that are super territorial and all hopped up on hormones.

But you can’t back troll plugs without a boat right? What about the bank angler? Well… good news! With the help of a Luhr Jensen Hot Shot Side Planer (or similar device), you can fish plugs right off the shore. It’s a super fun and productive way to fish, too!

Hot Shot Side Planer
Recently, I’ve met a lot of anglers who are a bit confused as to how to rig a side planer… truth is the instructions on the package are more than just a little hard to follow. So, for those of you like me for whom pictures are better than words, here’s a nice, clear step-by-step look at how to rig one of these handy little steelhead catching tools.

Step 1


Run your main line from the rod tip down through the wire eye at the front of the planer. I like colored braid for planer fishing so I can see where my rig is.

Step 2


Next, the line goes down through the hole on the top side of the side planer.

Step 3


Now, flip the planer over and run the line out through the screw eye on the back end of the unit.

Step 4

How-To-Side-Planer-4
Slide a bead up your main line and then tie a barrel swivel to the end. Your leader goes on the other eye of the swivel. Generally, I’ll run 3 to 6 feet of leader…but for the photo I kept it short, Finish it off with your favorite lure, in this case the super hot Yakima Bait MagLip. On larger waters, I love the 3.5 size. The new smaller 3.0 is awesome on smaller streams or when you have really clear water.

Step 5

How-To-Side-Planer5
Now, you’re going to want to let out some line. With your reel in freespool, hold the planer in one hand and pull several feet of line through (and out the back of) the side planer. How much line you pull through is going to set the distance behind the planer your plug will be fishing. In clear or deep water, longer is better. I typically set my plug 15-30 feet behind the planer.

Step 6


Okay, now you are about ready to get this baby wet! The next step to to ensure you have proper orientation of the planer. The wire rod at the front of the planer should always be pointed towards you and the “outrigger” arm should always face away from you. The arm easily attaches to either side of the planer and the wire will swing either direction. You have to adjust these two things depending on the side of the river you are on and which direction the current is running. Anyway, lock the wire eye into the notch of the planer as shown here.

Step 7


Once the wire is snapped into place facing you, wrap your mainline 4-5 times around the tab at the front of the planer, keeping it tight between the wire eye and the tab. This keeps the planer where you set it (as I mentioned before, usually 15 to 30 feet ahead of the plug). When you start reeling in, the planer will slide back down to your swivel so you can fight the fish without having it well up the line.

Fishing the Side Planer

hot-shot-side-planer-close
Okay, now it’s time to fish! In this case, the river is flowing from right to left, so we have to reverse the sides that the wire and outrigger arm from the ones in the rigging pix. Set the plug in the water and then ease the planer in as well, keeping tension on the line so it doesn’t unravel off the nose tab. You have to put the rig in water with some current, otherwise it won’t go anywhere!

fishing-reel-close-up
With the reel in free spool, use your thumb to let line slip off the reel under tension. You need the tension on the rod side to help to get he planer to pull away from you.

hot-shot-side-planer-overhead_01
It can take a while to work the planer out into the current, but it should eventually start pulling down and across from your position. The Luhr Jensen Hot Shot Side Planer comes with two different sized fins to run on the outrigger arm. Use the large one in slow water and the smaller one in fast water.

hot-shot-side-planer-wide-2Continue to let line out at a controlled rate with your thumb until you get the plug and planer where you want them. As you can see, I have the planer working here near the opposite bank of a smaller river. Once in place, you can just hang out and wait for a fish to come to you or you can slowly walk downstream, back trolling like you would from a boat.
As I mentioned earlier, strikes are often savage! Resist the temptation to set the hook immediately and instead let the fish turn downstream with the plug first.

More Steelhead Techniques

Filed Under: Best of FishwithJD, Steelhead, Techniques Tagged With: backtrolling, hot shot, How-to, maglip, plugs, river, Salmon, side planer, Steelhead

3 Plastic Worm Rigs to Help You Catch More Steelhead

February 25, 2015 By JD 4 Comments

steelhead-and-worm
Steelhead love plastic worms! While there lots of ways you can fish ’em, these three rigs have been hot all up and down the coast this season.

1. Bobber & Worm Jig


For the beginning steelheader, this rig is a great place to start. Very few moving parts and it’s deadly effective! Fish it on a dead-drift and set the float so that the worm is about a foot off the bottom.

I typically use a fixed balsa float like the Thill Turbomaster, a 1/8-ounce jig headhead and a 4″ Mad River Steelhead Worm.

Standard pink is a good all-around worm color color, but the one pictured above is called the “Nightmare” pattern and it is a killer in low, clear water! For this rig, spinning gear is the way to go because its so light.

2. Jet Diver Rig


If you have a boat, back trolling a worm behind a diver (just like you would a plug) is an awesome way to hook steelhead. For several seasons in a row, this is the only rig I guided with for winter steelhead.

Let it out 40-70 feet behind the boat and slowly slip downstream at a pace that’s about half the current’s speed. There are three types of bites on a back trolled worm: The “tap-tap-tap” style, which is often (but not always a smaller fish). Then, you have the two-stager that starts with a solid thump, followed by a pause and then the rod doubles over. And finally, my personal favorite: The “suicide bite” in which the fish grabs the worm and then makes a crazy headlong dash for the sea while you try to hang on.

Disclosure: When you purchase a product through one of the links you find on this site, I may get a very small commission – there’s no extra cost to you. I only highlight products that I have used and believe in. And by using these affiliate links you can help me keep this website up and running (thanks!). For more info, check out our Affiliate Disclosure page here.

Pictured is a 4-inch Mad River worm, but you can drop down to the smaller 3-inch size in super clear water or go up to a 6 incher on big water. Late season big wild bucks are particularly fond of a big pink worm. You can go with a Corkie, Spin-N-Glo or Hard Fish Pill ahead of the worm to give it extra color and buoyancy – or use a floating worm instead.

I generally run a 4- to 6-foot leader down to the worm and an 8- to 16-inch dropper line to the diver. Speaking of divers, you can use size 10 or 20 Luhr Jensen Jet Divers, or go with a Brad’s Bait Diver.

3. Bobber Dog Worm Rig


Here’s one you can use from shore or a boat – the Bobber Dog Worm Rig! For this setup, run a slider or “slip” float like a Clear Drift (pictured), or Beau Mac Float. I generally run a 1/2- to 3/4-ounce model, depending on the size and flow of the river and how much lead I need to get down.

Slinky sinkers work well for this technique as they are very snag resistant. Add a 4- to 6-inch worm and you are in business. For this rig, I ran the worm upside down or “half wacky” style to give it some extra action. You can also thread a worm straight onto the leader like in the Diver rig above. In this case, I have a Hard Fish Pill on the line between the worm and hook to add a little more flotation.

My Favorite Steelhead Fishing Gear

In traditional float fishing (as with the jig and bobber method mentioned earlier), you fish the lure suspended off the bottom. But the Bobber Dog rig is different in that you want your sinker to tap the bottom the whole time. So, set your bobber stop to a depth that’s at least a few feet deeper than the water you are fishing. This is like a drift fishing/bobber fishing hybrid and it can be really effective because your gear is always down in the strike zone.

Give these rigs a try the next time you hit the river. Stay tuned because I’ll be posting more rigs and tips soon!

More Steelhead Techniques

Filed Under: Best of FishwithJD, Steelhead, Techniques Tagged With: bobber, featured, How-to, jet diver, plastic worm, rigs, Steelhead

How to Cure Roe for Salmon and Steelhead Fishing

October 21, 2014 By JD 14 Comments

how-to-cure-roe
Here’s a fun little exercise in futility: Ask a salmon angler what’s in his favorite cure. First, you’ll get a blank stare, followed by some incoherent mumbling and then a very deliberate attempt to change the subject – it’s almost as if you’re talking to a politician about illegal campaign contributions. Guys get very protective of their cures and it’s usually one of those don’t ask type of deals. It’s a dead end!

Luckily, there are plenty of commercially produced cures on the market that produce excellent baits. Pro Cure, Pro Glow, Shur-Cure and Pautzke’s Fire Cure  are all excellent choices, though my favorite ready-made cure for salmon is Atlas-Mikes Shake & Cure.  You really can’t go wrong with any of those. Each brand has it’s own suggested curing method so all you have to do is follow the directions on the side of the container and you’re in business.

Ultimate Guide to Steelhead Bank Fishing

If you want to really keep it basic,there are some new liquid cures out there that all you have to do is pour some over your bait and… Presto…in several hours, you have cured roe! Read my article on how to do that HERE  If you want to go ahead and try making your own cure, read on…

Click here to read more…

Filed Under: Salmon, Steelhead Tagged With: bait, curing, roe, Salmon, Steelhead

  • « Previous Page
  • 1
  • 2
  • 3
  • 4
  • 5
  • 6
  • …
  • 8
  • Next Page »
  • Facebook
  • Instagram
  • Twitter
  • YouTube

JD’s Top Gear Picks

  • Steelhead
  • Kokanee
  • River Salmon Trolling
  • Plug Fishing for Salmon
  • Light Tackle Surf Perch

Legal

  • Privacy Policy
  • Terms & Conditions

Copyright © 2025 Richey Sportfishing